Monday, 20 December 2010

Raspberry-Blueberry Mousse Cream Cake (Niilo's birthday cake)


Prepare springform cake pan
5 Eggs, Sugar, Potato starch-flour-baking powder
mix all in equal portions.
Pour Sugar into Eggs and Whisk well


See the volume and the color of the whisked eggs and sugar?

Flour mix and a sieve


Sieve flour-starch-baking powder mixture and fold.

Pour batter into the prepared baking pan/tin.

Bake in the oven for about 40 -50 mins (check instructions)

Sponge Base 


Ingredients:

1 Glass of Egg (5 eggs)
1 Glass of Sugar
1/3 Glass of Potato starch }
2/3 Glass of Flour             } sieve together
1 tsp of Baking Powder     }

Method:

  • Preheat the oven for 180°C (360 °F)
  • Prepare a 9 inch/24 cm springform pan (butter and breadcrumbs or butter and flour) 
  • Whip eggs and sugar until fluffy (very light yellow almost double in volume)
  • Sieve in the flour into the egg batter and fold in until well mixed.
  • Spoon the batter into the prepared cake pan and bake for about 40-50 mins depending on oven type (if fan assisted reduce temperature by about 5°C or about 30 °F)
Frozen berries waiting to be melted with sugar

Blended berries placed back into heat to dissolve gelatin.

Cooled (lukewarm) berries mixture folded into whipped cream.


Raspberry-Blueberry Mousse


Ingredients:


1 1/2 dl frozen Raspberries
1 dl frozen blueberries (I used wild blueberries/ bilberries)
1 1/2 sheet of gelatin (if using Dr. Oetker brand then two sheets since they are shorter for some reason)
3 tablespoon of sugar
3 dl of whipping cream
1 tsp if vanilla sugar

Method:


  • Soak the gelatin sheets in cold water.
  • Heat the berries with sugar until melted but not boiling.
  • In a large mug (use the ones that were provided by the stick blender you've purchased) blend the berries but not too much.
  • Put berries back to stove to medium.
  • Place the soften gelatin sheets until dissolves into the berry mix.
  • Leave the berry-gelatin mix aside to cool.
  • In a large bowl place whipping cream and vanilla sugar.
  • Whip the cream until peak
  • Fold in the berry-gelatin mixture until it's evenly mixed
  • Place the mixture in the fridge until cake is cool enough to be put together.

Slap on half the portion of berry-mousse
onto the milk moisten sponge base

Top up with another layer of sponge base
(don't forget to moisten with milk) and then add the
remaining berry mousse on to the base before topping it off with
the final layer of sponge.

I used a large tip basketweave to spread the
cream on to the cake.

Notice how messy it looks now? Don't worry...

This is the finished result. And it's not quite done yet.

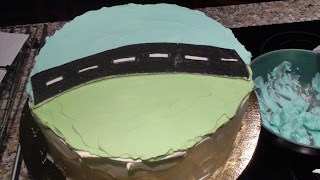
I wanted to make a cartoony sky and grass look
with a road to split the two sides.
Hence I used a spoon to make the shape in the middle
to split the colors.

Now you get an idea what it looks like once the colored cream
is spread.

I placed the fondant road on top of the cake.

Added the car to check what it looks like later =D.
The finished product.
To Decorate the cake
500 ml of milk         }
1 tsp of vanilla sugar} mix together

550 ml of Whipping cream
Assorted food coloring (Wilton food coloring was used in this picture)
2 tsp of vanilla sugar
2-3 Tbs of Sugar

Notes: You only moisten the cake once you've put it in place not before transferring. The reason is that if you were to moisten it before transferring the cake, it will be too soft and there is a greater risk for you to break the sponge cake.


Sunday, 12 December 2010

The Gingerbread cookies/ Piparkakku Taikina (also vegan friendly)

Ingredients
1 3/4 dl syrup
2 dl sugar
1 dl water 
200 grams of butter or margarine (vegetable based)
2.5 Tbsp - 3 Tbsp of ála Meira Gingerbread spice mix
2 tsp of baking soda  }Mix into flour to be sieved 
1 L of flour                } 


Method:


Heat the syrup, sugar and spice until sugar has dissolve and the spices start to smell your kitchen (I love this bit). Remove the syrup mixture away from heat and put in the butter to melt into the syrup mix and stir well. Pour this mixture into a mixing bowl. Add the water and mix well. Sieve the flour and baking soda mixture into the syrup to make a cookie dough. You can beat with hand but I use an electric mixer. Put the dough in a cling film and refrigerate for at least 3 hours or overnight. Once the dough is ready, split the amount you want to prepare and cut out shapes with your cookie cutter. Bake in the oven for 6-8 mins depending how thin you want your cookies at 180 -200 °C (I make them so thin that it's hard to lift them to the baking tray after cutting out the shapes because I just love the crunchie cookies)


Gingerbread cookies
Piparkakku


Ainekset
1 3/4 dl siirappia
2 dl sokeri
1 dl vettä
200 gram voi tai Keiju (tumma sininen, se pitäis olla vegaani)
2.5 rkl - 3 rkl á la Meira piparkakkumauste
2 tl ruokasooda
1 L vehnäjauho


Valmistus:


Kuumenna siirappi, sokeri ja mauste, kunnes sokeri on hajottaa. Poista siirappi seos pois liedelltä ja laita voita tai margariini sulautuvat siirappi sekoitetaan ja sekoita hyvin. Kaada seos kulhoon. Lisää vesi ja sekoita hyvin. Siivilöi jauhot ja leivinjauhe seos siirappi sekoita kunnes ainekset muuttu taikinan. Voit vatkaa käsi voimalla, mutta käytän sähkövatkain. Laita taikina kelmulla ja kylmässä vähintään 3 tuntia tai yön yli. Kun taikina on valmis, jaettu määrä haluat valmistaa ja leikata kuvioita suosikki pipari muoti. Paista uunissa 6-8 min, riippuen kuinka ohut haluat  180 -200 ° C noin 6 - 8 minutti.


Spice mix if you don't have á la meira brand spice mix:


1.5 tbs cinammon powder
1.5 tbs of ginger powder
1.5 tbs of clove powder
1-2 tsp of bitter orange powder (depends how orangey you like, becareful too much could make it bitter)

Note: You can make more and keep if you plan to make a bigger batch of cookies! =)

Mausteseos jos sinulla ei ole à la Meira merkki Piparkakkumauste:
1,5 rkl kaneli jauhe1,5 rkl inkivääriä jauhe1,5 rkl neilikka jauhe1-2 tl pomeranssi jauhe (riippuu kuinka 'appelsiinimainen' haluat, ole varovainen liikaa voisi olla kitkerä)
Huomautus: Voit tehdä enemmän ja säily, jos aiot tehdä suuremman erän taikina! =)

The Gingerbread experiment - what's cooking this Xmas?

A short story on my journey to find the best gingerbread recipe. I've looked high and low in the internet and also at some point gave in to getting the store bought frozen dough (yuck!). I have also tried the ones that had eggs and to my big disappointment the texture of the cookie was not what I expected. Let's put it this way. The ones that contain egg's texture got worse each passing day.

I've also looked high and low in stores for the best ready spice mixture for the gingerbread cookies. I've found that the Á la Meira ones are better than the Santa Maria. The reason being that I do like my gingerbread cookies to have a hint of citrus (this being the bitter orange or in Finnish pomeranssi).

Blue Bag - Santa Maria Gingerbread spice
and
Yellow-green Bag- á la meira Gingerbread spice
If you cannot find this in your local store (wherever you are) I've measured a good recipe spice mix to get close to the á la meira spice as possible.

I've done an experiment to put 1/5 parts of Santa Maria Gingerbread mix and 4/5 parts of the Á la Meira Gingerbread mix and the cookies are still splendid.

The difference between the two spices are:

Santa Maria:-
Ginger
Cinnamon,
Clove
Cardamom

Á la Meira:-
Ginger
Cinnamon
Clove
Bitter Orange

I don't mind having cardamom in my cookies but too much is too much. I'm not making pulla! I'll create the Gingerbread cookie recipe is both English and Finnish, since this is a more Finnish traditional recipe ;-).

Tuesday, 30 November 2010

Rich Chococlate Cake

Rich Chocolate Cake
Ingredients
4 Large Eggs
250 gr of Butter
400 gr of Caster sugar
1 tsp of Vanilla essence (pure vanilla is better than vanillin)
250 ml of Milk
1 dl of Cocoa powder      }
3 dl of Flour                      }Mix and sieve together
1 tsp of Bicarbonate soda }
2 tsp of Baking powder    }

Method

  • Beat up the butter and sugar until fluffy (It might look like there's alot of sugar, reduce it by 50 grams if you don't desire to have too sweet of a cake base)
  • Add egg one at a time beating well. After adding two eggs put in the vanilla essence and continue to beat in the eggs one at a time until combined.
  • Sieve the flour mixture into the batter alternately with milk until everything is well mixed with an electric beater.
  • Pour batter into a 28 inch springform bakepan that has been buttered.
  • Bake in the oven at 180 °C for about an hour or until you put a toothpick in and it comes clean.
  • Once the cake is done allow to cool while you make the icing.
Icing
100 gr Salted/unsalted butter (your choice if you like it with a hint of salt)
2 dl  Full cream/whipping cream/double cream
1 Big block of cooking chocolate (I use the minimum 60% pure cocoa type) [250 grams - 300 grams depending how chocolaty you like it to be]
1 Tbsp of Corn Syrup* 

*more if you want it sweeter, the purpose of using the corn syrup is to give it a nice shine while adding sweetness, you can also use golden syrup. A friend recommended maple and I didn't quite like the side taste to chocolate

Method
  • Heat cream until boiling point at medium heat.
  • Melt butter in the cream continuously beating until mixed well.
  • Take the cream mixture off the heat and add the chocolate (at this point you'd think oh god have I done something wrong it's not looking right, if not, good for you because I was in panic)
  • Keep adding chocolate until you get a smooth silky texture.
  • Allow to cool for 10-20 minutes before starting to spread it in between and over the cake.
  • To get it to a thicker consistency leave in fridge for another 5 - 10 mins :) Don't leave it too long or else you'll end up having harder than peanut butter consistency making it difficult to spread on the very moist cake.
  • As you can see on the photo above, I couldn't wait even the 10 minutes hence it's so liquidy...but it was gooooooooooooOOOoooOOoood!

Saturday, 20 November 2010

Working on some classics

Hello!!!

Sorry for the delay in posting the Blueberry-raspberry mousse sponge cake recipe. I wanted to get photos of the process before posting it up. For that I'd need to buy some glasses from ikea that looks a bit more presentable for the shoot. I'll be visiting Ikea with a friend and colleague of mine next week to do a little shopping ^___^.

As a bonus for waiting, I'll put up a recipe for a devilish chocolate cake I made recently.

Cheers!

Sunday, 14 November 2010

New recipes and editing old ones with photos

Howdy! I've been rather lazy lately to add anything here because I've been rather busy with work, parenting and studying + cleaning and cooking. I've made various foods but haven't been able to take a picture of it to post the recipe here. As you notice the recipes without any picture is unappetizing. I'll try my best to put something up as soon as possible... Here's a photo of a cake I made for my ex-boss and a few colleagues during their farewell party. I'll have to put the recipe up.

Blueberry-Raspberry Mousse Filled Cake with Fresh Cream
The composition:

Filling - Blueberry-Raspberry mousse with Strawberry Marmalade
Icing - Whipped fresh cream with a hint of vanilla(vanillin)
Topping - Blueberry-Raspberry with gelatine glaze
Cake - Your very basic sponge

Sunday, 25 July 2010

Jacey's Easy Day meatloaf

Ready to eat Meatloaf


Ingredients:

800 grams of minced beef/pork-beef
150 ml of breadcrumbs
1 egg
1 large Onion (minced)
2 Tbsp Butter
2 tsp of Cayenne pepper
2 Tbsp of Black Pepper
2 tsp of garlic powder
2 tsp of onion powder
2 Tbsp of finely chopped fresh parsley
200 ml of cream
Salt to taste

Optional:
1 small sweet pepper minced

Method:
  • Grease a loaf pan with butter.
  • Beat the eggs and cream together with all the spices, herbs and salt (you may want to add a little more salt as you'll be mixing this into the rest of the batter), leave aside to set for a while.
  • Gently brown the onions in a frying pan with butter and allow to cool.
  • Mix the onions into the minced meat along with the bread crumbs, and mix well.
  • Pour in the beaten egg and cream batter into the minced meat dough and place into the loaf pan.
  • You may place the meatloaf in the oven immediately or prepare this in advance in reception of lots of kids :). Serve with mash potatoes and save the juice from the meatloaf to make a good sauce.
  • If cooking immediately place in oven at 225°C for about 1- 1 1/2 hours (reducing heat to about 180°C about halfway through to avoid drying too much)
  • If cooking the next day. Allow meatloaf to sit in room temperature for about an hour and cook for about 225°C for about 1 - 1 1/2 hours reducing heat to about 180°C halfway through)
  • Note: Adjust the time according to your oven type. Make sure that the meat is completely cooked before serving especially when using pork. The best way to find out is to pierce the meat in the center and allow the juice to run clear. If it appears a reddish cook for another 35 mins (in 170°C), if it appears a little pink then cook for another 15-20 mins (in 170°C).

Chocolate Buttercream Frosting

The Buttercream frosting

Ingredients:

120 ml of solid vegetable shortening
150 ml of solid butter (unsalted if you don't like the salty taste)
200 ml of unsweetened cocoa powder OR 50 grams of unsweetened melted cooking chocolate (I prefer cooking chocolate because the texture of the buttercream will be smoother)
700 ml of confectioners sugar (in Finnish: Tomusokeri, you can reduce the amount of sugar if you are using sweetened cooking chocolate)
3-4 Tbsp of milk

Method:
  • Mix shortening and butter until well beat with medium-high speed.
  • Add the melted chocolate or cocoa powder and beat well at medium speed.
  • Sieve in the confectioner's sugar a little at a time and beat at low speed to avoid clouding.
  • Finally add the milk a little at a time until the mixture is smooth.

The icing can be put into the fridge and can last up to 2 weeks. To reuse take out of the fridge and allow to 2 hours at room temperature, whisk it up before using to pipe it on the cupcake or spreading over cakes.

For the recipe of the chocolate cupcake go here: Chocolate Cupcake recipe

Chocolate cupcake

Chocolate Cupcake with Chocolate Buttercream Frosting


Ingredients:

4-5 Tbs (heap) of butter (room temperature)
300 ml of sugar (I use less because I don't like my cakes too sweet)
300 ml of all purpose flour                    }
170 ml unsweetened cocoa powder      }
2 tsp baking powder                            }    Mix all this together
1/3 tsp baking soda                             }
1/8 tsp salt (or a pinch) (omit this if you're using salted butter)
2 eggs (break them into a cup so you could pour into the batter a little at the time)
3/4 tsp Vanilla extract or 1 tsp of Vanilla sugar
200 ml of milk

Method:
  • Beat butter and sugar until fluffy at medium speed.
  • Add eggs a little at a time until beaten in at medium speed. Throw in salt (if using) and continue to mix.
  • Add vanilla extract/vanilla sugar and continue to beat until well blended.
  • Pour in flour mixture a little at a time and beat at low speed until well blended.
  • Now your mixture would be rather thick, add the milk and beat until well blended.
  • Scoop the batter into muffin pan (about half portion of the standard muffin pan as the cupcake tends to rise, you do not want it too round so that you can make a prettier buttercream swirl) and bake at 180°C for about 30 mins (to make sure that cupcakes are cook stick in a toothpick and make sure that toothpick comes out clean) You may need to adjust the time depending on your oven or even turn the pan around for even browning.
Please check Chocolate Buttercream Frosting for the frosting recipe.

09 April 2011 - I'll add the Chocolate Ganache Frosting shortly =)

Wednesday, 7 July 2010

Chocolate Mousse cake (Vegan friendly and gluten free)

First draft:

Chocolate Mousse cake (Vegan friendly, lactose intolerant friendly and gluten free)

Ingredients
400 ml of oat whipping cream (fridge temperature)
200 ml of rice or other veggie based whipping cream (fridge temperature)
1 teaspoon of vanilla sugar
250 grams of dark chocolate (milk free) (make sure you dissolve chocolate to runny texture, microwave or bain marie will do)
3 Tablespoons of vegan friendly margarine (melted)
2  Tablespoons of brown cane sugar
1 pack of gluten free digestives Semper oat digestive or Glutano digestive (these are wheat free, milk free, egg free)

Optional
1-2 teaspoon of agar jelly dissolved in hot water (If you're not familiar with using agar you can screw it up pretty badly)
Berries for decoration

Method
  • Break the cookies into crumbles and add the sugar.
  • Pour the melted margarine onto the cookie and mix well.
  • Press the cookie dough mixture into a 24 cm springform pan and bake in the oven at 200 degrees C for about 5-10 mins (depending how dark you want it to be)
  • Remove the cookie dough from oven and allow to cool on a wired rack.
  • Once the cookie base has harden you may proceed to make the mousse. Put all the cream together and whip until almost double in volume
  • Add vanilla sugar and melted chocolate and continue to whip (for a more grainy texture half whip and then stir the chocolate to get a chocolate chippy effect)
  • Scoop the finished mousse onto the cookie base and even it out.
  • Leave the cake in the fridge overnight (at least 6 hours) before serving. 
Note: To remove cake from the springform, run a thin knife (preferably dipped in hot water) around the edges to loosen the side before releasing the baking tin. If you use baking sheet underneath the cookie base it will make it easier to transfer to a serving dish. =) Enjoy!

Ps: The original recipe is slightly different, taken from a Finnish website called Kinuskikissa. I didn't like how it turned out so I had to adapt it to make work for me :). You should experiment to get the best results up to your taste.

Sunday, 4 July 2010

Broccoli and Cauliflower Gratin (Vegan friendly)

The Ingredients


Broccoli and Cauliflower Gratin (Vegan friendly)


Ingredients
400 gr broccoli
400 gr cauliflower
Pot of water + salt 
2 Tbsp Margarine (I use Keiju blue as this was told to be without anything of animal origin)
1-1 1/2 Tbsp of flour
200 ml soya milk
200-250 ml oat cream (oatly cooking cream, the black box in this picture)
Dash of nutmeg
Dash of white pepper (as strong as you want it to be)
Salt to taste

Optional
1 tsp Vegetable fond
Dash of Garlic powder (not in picture because I was too fast with the photo :P)

Method
  • Boil a pot of water and put in the harder stems from broccoli to cook for a few minutes (2-3 mins) followed by the cauliflower and the rest of the broccoli florets (cook for another 3 mins or so)
  • Drain the veggies leaving behind some of the broth to add taste and to thin the gratin sauce. Pour the veggies into a oven proof bowl that is greased with margarine. Heat a saucepan (stainless steel pot) with the margarine and whisk in the flour until it turns into roux (thicker consistency)
  • Reduce heat and pour in the soya milk and continue to whisk until flour has dissolved. Add the cream and continue to whisk. Now put in all the spices and add the broth from the veggie to thickness you desired (I usually add about 100 ml of the broth). Taste and add more salt if needed. You may also add some vegetable fond and garlic for the extra kick. It's good without it anyways :).
  • Pour the finished gratin sauce all over the broccoli and cauliflower. Cook in the oven for 30 -35 mins at 200 °C (fan assisted at 180°C for 30-35 mins) or otherwise until there's a slight golden layer.
Caution: Don't serve the casserole immediately. Leave it to cool after removing it from the oven for 5-10 mins. 

Enjoy!

The Finished Product


Tuesday, 16 February 2010

Chocolate Hazelnut Creme Cake

 Chocolate Hazelnut Creme Cake
 
The Chocolate Sponge Cake (rather standard recipe) 
(Note: Prepare a day or 2 in advance and keep in fridge after it is cooled to room temperature)

Ingredients
4 eggs
150 ml sugar
100 ml corn or potato starch
50 ml flour
1 1/2 tsp baking powder
50 ml cocoa powder

Method
Mix dry ingredients (except sugar) and set aside. Beat eggs and sugar together until stiff (basically when the batter looks light yellowish) then sieve the dry ingredients folding into the beaten eggs. (Don't stir, if you stir it will release the air and your cake my end up more dense and lose the spongey airy texture). Bake in a 9 inch round tin at 175° C for 35-45 mins (check constantly as every oven varies) Stick a toothpick in the center and if the stick comes out clean the cake is ready.

Chocolate Hazelnut Creme Filling
 The Chocolate Hazelnut mixture before adding the cream (It looks rather grainy)

Ingredients

A)
4 Tbps Hazelnut butter (You can make this yourself if you can't find them from the store)
100 ml water
2 pcs gelatine leaves (soak in cold water until soften)
3 Tbsp sugar (I don't like my cakes too sweet, so you can add more and if you like it with EVEN less sugar you can reduce it)
1 Tbsp butter
200 grams of cooking chocolate (semi sweet)

B)
500 ml of whipping cream
2 Tbsp sugar
1 tsp pure vanilla essence
Method

Prepare two pots, one for heating the hazelnut butter to give it an extra punch and the other to boil the water and sugar. First heat up the hazelnut until you get a nutty fragrant (this will take about 5 mins on medium heat) stiring constantly. Leave aside, on the second pot heat water until boiling point, add sugar until it is melted. Remove from heat and drop the gelatine leaves and stir until dissolve. Now add the chocolate and stir until melted followed by butter to add the extra taste and gloss. Finally add hazelnut butter paste and stir well.

Now prepare the whipping cream, mix the sugar and vanilla essence and beat until the cream stand in peaks. Pour in the hazelnut creme mixture and fold until mixture is even (yes the mixture still has to be lukewarm, don't worry if the cream melts a little the gelatine will set it once it's in the fridge). Now leave the entire bowl in the fridge under a cling film for at least 3 hours.

Chocolate mousse topping

Ingredients
600 -700 ml  whipping cream
200 grm cooking chocolate (semi sweet)
6 Tbs sugar
1 tsp vanilla essence (or 2 tsp vanilla sugar, vanilla essence is rather pungent and will overwhelm if you use too much, unless you like it by all means :D)
100 ml of water
3 pcs  gelatine leave (soak in water) 

Method
Bring water to boil and add sugar. Stir until dissolved, remove from heat and add the gelatine leaves. Add chocolate pieces until melted. Whisk the whipping cream with vanilla essence (no extra sugar is needed as it is all poured into the chocolate mixture) until it stands in peaks. Fold in the cooled chocolate mixture into the whipped cream. Don't worry if there are some streaks, it creates a nice effect :). Cool in the fridge for at least 3 hours before using to decorate on the cake or else it will start to weep.

Notes: It is best to keep the cream overnight in a piping bag if you're using it to pipe on the cake. This way it avoids the mousse or cream from melting.

When assembling the cake, you should assemble it back into the cake tin that you made in, this way the cake will hold its shape better. After assembling the filling return the cake under cling film back into the fridge for an hour before piping the 'icing' on.

Monday, 15 February 2010

Sambal Ikan Billis (Sambal with anchovies) + Vegan version

Original recipe:

1 Über large Onion
1 dl of Anchovies (dried and salted kind you can find from Asian stores)
1 clove garlic
6 shallots
3 Tbs of Tamarind Juice (Make this out of tamarind paste, the kind that has still the seeds in them)
10 large dried chillies (soaked)
Prawn paste (I would not recommend this) (optional)
Salt and Sugar up to taste

Method
  • Fry the ikan Bilis until crisp and put aside
  • Grind the prawn paste (ewww) together with shallots, garlic, deseeded (why the hell?) dried chillies. Slice über onions into rings.
  • Heat about 2-3 tbs of oil (don't use olive and don't even try margarine <__<)
  • Fry the grounded paste until fragrant, then add sliced über onion rings.
  • Add tamarind juice, salt and sugar
  • If it seem to get a bit too dry you may add a few tbs of water
  • Cook, stirring occasionally until gravy thickens.
  • Add Ikan bilis and mix well
  • Serve with steaming hot Nasi Lemak
El-Modified version (Vegan Friendly) 1 Über large Onion 1 clove garlic 8 shallots 3 Tbs of Tamarind Juice (Make this out of tamarind paste, the kind that has still the seeds in them) 10 large dried chillies (soaked) Salt and Sugar up to taste Method:
  • Grind the shallots, garlic and dried chillies (not deseeded) together. Slice über onions into rings.
  • Heat about 2-3 tbs of oil (don't use olive and don't even try margarine <__<)
  • Fry the grounded paste until fragrant, then add sliced über onion rings.
  • Add tamarind juice, salt and sugar
  • If it seem to get a bit too dry you may add a few tbs of water
  • Cook, stirring occasionally until gravy thickens.
  • Serve with steaming hot Nasi Lemak

Curry Puff (Malaysian)


Ingredients


Water Dough:
350 gm of flour
about 3/4 dl of oil
about 1 1/2 dl of water
pinch of salt to taste

Grease Dough:
180-200 gm of flour
100-130 gm of margarine/butter (I prefer margarine it's easier to work with and doesn't taste too heavy, plus you can make this ultimately vegan without using any form of animal product)

Filling:
2-3 Large potatoes diced to about 0.5 cm cubes or smaller but not minced. (preferable all purpose potatoes, the hard ones take too long to cook and the mashed type...well you know <_<)

Other:
1 litre of oil for frying

Method:

Let's start with the filling since it takes a bit longer to prepare. Put oil in a large wok or frying pan and heat until medium hot. Reduce the heat and add in garlic and onions. Fry until soft. Put in the curry paste and curry leaves and fry until fragrant in low heat (about 3 mins should be enough to avoid drying). Now increase the heat to medium -high and throw in the potatoes and a bit of water at a time and keep frying until potatoes are cooked. Towards the end add the sugar and salt. Taste and adjust to your liking. (Note: I use sugar to bring out the taste of the potatoes, you may reduce the amount as this filling is not meant to be too sweet or else it'll be curry dessert and it's not that nice <_<).

Water dough: Mix all ingredients together and knead into a firm dough.

Grease dough: Pinch melted margarine into flour and mix into a firm dough.

Split both water dough and grease dough to equal amounts of little doughs (around 4 balls?). Water dough is approximately 1 1/2 times bigger than the grease dough.

O - size of water dough (not to scale :P)
o- Size of grease dough (not to scale :P)

Wrap the grease dough inside the water dough and seal them and leave under cling wrap to avoid drying until all dough is completed.

Now take one of the dough balls and flatten it into a long oval sort of like a flat loaf (or shape of naan bread with even ends) avoid breaking the dough so that the grease dough reveals. Now roll the dough like you would a swiss roll tugged in tigthly avoiding air in between. Use a sharp knife and cut the roll into 1 cm cookie like slices. After all the rolls are cut, flatten the cookie like slices into a nice round pastry crust and put about 1-2 tsp of filling in each, fold in half and pleat the sides to seal. Avoid stretching the dough too much since broken dough makes holes that would cause hell while frying as the filling touches the oil and POPS!. Otherwise wear a biohazard or space suit while frying to avoid oil burns.

Gyoza

More or less like Japanese version of the Chinese 'Wo- Tip' instead of just steaming it's sorta grilled then semi steamed.


  • 400 grams ground pork
  • 2 - 2.5 dl chopped cabbage (boiled and cooled)
  • 1 tablespoon soya sauce
  • 1/4 teaspoon sesame oil
  • 3-4 tablespoons vegetable oil for frying, or as
  • 1 small green/yellow onion, diced
  • 2 teaspoons minced ginger (REALLY minced)
  • 1 egg
  • salt and white pepper to taste
In a bowl, combine the ground pork, cooked cabbage, onion, minced ginger, egg, soya sauce, salt, pepper and sesame oil. Mix well until all ingredients are well combined to avoid having saltier spots.


Place gyoza wrappers in front of you. Wet the edges with water. Place a teaspoon or two of filling in the middle of the wrapper. Fold the sides up to form a semicircle, and then pinch the edges to seal. Continue with the rest of the gyoza wrappers until the filling is gone. (I'm lazy so I bought meself a gyoza clamping thing-a-me-bob)

To cook, heat 2 tablespoon oil in a heavy frying pan over medium-high to high heat. Add 12 - 15 of the gyoza and cook for 2 minutes, or until golden brown on the bottom (Eh, GOLDEN BROWN not BURNT!).

Add 250 ml of water to the frying pan. Cover the dumplings and cook until the water is absorbed (8 minutes). Repeat the procedure until all your dumplings are out.


Tip: I usually buy the frozen wrappers from the oriental store/asian store. I have a recipe to make those wrappers too but when you make them yourself, the wrappers tend to become thicker than the ones made from the store and the size...don't even let me start! <__<

Pineapple Jam

Cut the pineapple, remove skin, eyes and core.

After you've grated/crushed/pureed follow the
cooking instructions below and
boil it to reduce the liquid.

The texture should look something
like this


Ingredients:

1 Whole Pineapple (Remove skin, core and crushed) (semi-sweet preferred)
8-10 Tablespoons of Sugar
1 dl water
1 teaspoon Cornstarch (mixed with 1 tablespoon of water)

Method:

Boil the pineapple in medium heat stirring constantly until soft (approximately 45 mins). Add water and keep boiling until pineapple looks slightly brownish while constantly stiring to avoid the pineapple from burning at the bottom of your pot (another 20 mins). Reduce heat to low and add sugar (cook for another 5 mins or so). End it with the Cornstarch mixture and let simmer for another 5-10 mins until it looks pastey. Leave aside to cool for at least 30 mins before placing it into a jar. Keeps refrigerated for approximately 5 days. If preservatives were added (according to package instructions) It could last from 1 month to a year....*

* I don't recommend preservatives, hence I only make enough to last a few days or to make a few tarts ;). You can always double or triple the recipe for making bigger batches.

Pineapple Jam version II (mainly for use in pineapple tart)

Ingredients:

1 Whole Pineapple (Remove, skin, core and crush/blend) (also semi sweet -sour even)
8-10 tbsp of Sugar (More if using sour pineapple)
1 stick of cinammon
1 piece clove
1/2 a piece of star anise (optional)
1/2 - 1 dl of water to rinse remainder of blender from pineapple smoother

Method:

Pour everything into a pot and heat at medium until boiled. Reduce the heat but come back to stir every now and again. Cook for about 1 hour (or more depending how moist you like your jam). Allow to cool before starting to create tarts. Same goes with the instruction above you can double or triple to increase the batch size.

Sunday, 14 February 2010

Vegetarian Curry (Vegan Friendly)

1 clove garlic (big clove or single clove garlic)
4-5 shallots
3 tablespoon of cooking oil (not olive oil)

1 litre water
Salt to taste
1 cm Ginger
1 dl coconut milk
2 carrots
1 big potato
1/2 cauliflower
1 zucchini
1 Aubergine
1 block hard type tofu or few pieces of fried tofu
(you can replace with any vegetable you wish as well)

For Mixing
1 1/2 tablespoon of water
2 tablespoons of curry powder (preferably the Malaysian type ;) )


Method:

Chop garlic and shallots to itty-bitty pieces. Put the water into the curry powder and make into paste (not soup PASTE!) Then fry the garlic, shallot and ginger mix in the heated oil in low heat until fragrant. After the garlic, shallots and ginger mix is ready, fry in the paste. Make sure the stove heat is very low when frying...fry for 5 mins. Pour the water a little at the time until the paste dissipates, about 500 ml. Then add the coconut milk. Now add the vegetables that take a longer time to cook first putting in the zucchini and aubergine last. Add a bit of salt at a time. Then add the rest of the water and leave it to boil on low heat for another 10 mins with lid on.